

NEW CHAIN PLATES- EPOXY REPAIRS ON DECK- NEW WINDOWS
Installing the new U-bolts was a precision job. These are the top shroud’s U-bolts. A new hole had to be done through the web. First we had to drill a pilot hole. Here again, the Contessa 32 forum helped us to understand exactly the procedure.

Then came the hole saw. This is were you can test the strength of the structure. The thickness of the GRP including the plywood was about 25 mm and extremely hard to get through !

And then we fitted temporarily the new U-bolts to make sure everything was correctly aligned.

Be aware of stainless nuts galling when fitting large threads ! It is important to use a bit of grease.

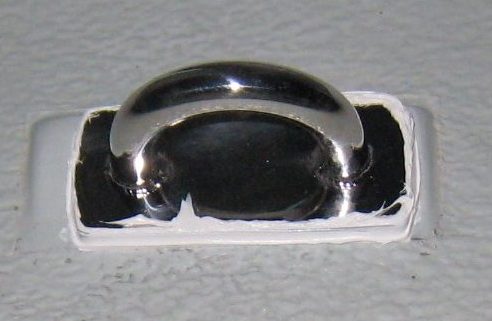
This is how it looked on deck before fixing the gear with marine sealant.

At home, during our day off we spent the afternoon refurbishing the old Lewmar winches. We had several of those Lewmar old style. Some of them were fine but others not in such good condition. Out of 5 winches we managed to exchange few pieces and finally got two great winches out of them. These old Lewmars are a great piece of gear and extremely simple to dismantle and maintain.

After opening the whole mechanism we used white spirit and a little brush to clean out the old grease which had become a thick greenish paste.


And of course, we polished with 3M paste the bronze and stainless parts using old toothbrushes and pieces of cloths. Everything was shining again !

We lubricated them with special Lewmar grease. Just enough but not too much of it on the ratchets and the roller bearings. The springs were given just a few drops of sewing machine oil.


After a few hours on our balcony we finally cleaned every single little piece. Springs were actually the only parts which had to be replaced. The rest of the winches were in excellent condition eventhough there were 40 years old. It was a real pleasure to hear again the nice clicking sound of our old Lewmars.

EPOXY SESSION: PART 4
Springtime came with the heat rising each day under our cover. We had to hurry up and finish the epoxy repairs on deck. Epoxy resin is a great material to work with, especially for amateurs. It is a bit like cooking. You take a pot, mix some resin and add different fillers depending on what you want to repair.
Nevertheless, there are some factors you have to avoid with epoxy and one of them is direct sunlight. This is why we had to work “under cover” !
The first step, if you want to repair a hole on a G.R.P. hull is to make a template. For that purpose we used a plastic sheat and drew on it the different layers of glass cloth we wanted to laminate.

There were all kind of holes on deck that had to be repaired. For example, the ventilation holes for a dorade box.

But the major hole we had to laminate was from an extra hatch above the heads. Here again we did a template before cutting out the fiberglass cloths.

Here are all the different cloths in their plastic bags. This is a protection measure to avoid any contamination from dust or humidity. It is very important when working with epoxy to be clean and organised. We used various types of glass cloths which were specific for epoxy works. These are not the same type as the ones you use with polyester resin, the binding agent is not the same. It is very common for most amateurs to use the wrong type of cloth.

With the use of peel ply cloth, we prepared some thin backing patches to be able to work from above and block the holes.

These backing patches are very simply made with two layers of biaxial cloth and resin. When pouring the resin on the cloth you have to make sure there is just enough resin to get the fiber translucid.

The result is a quite flexible piece of cured epoxy with glassfiber.

Then the backing patch had to be hold in place with some strings and glued to the ceiling with resin+silica.

This is how it looked when hold from above deck. The little holes for the strings will be filled later.

On the foredeck it was the same trick but the repair was a bit more complicate because that area had to be extremely strong. This is were the starboard cleat is suppose to be.

When everything was glued in place, it looked like a strange artistic installation !

After the backing patch was finally glued into place it was time to start filling the area.

First with epoxy resin that included colloidal silica and milled glass fiber. The result is was a thick paste intended for small semi structural repairs and filling voids. This type of repairs are incredibly strong and tough.
After this application we had to wait for the treated area to cure. And to avoid any exothermic reaction, it was important to wait some time before putting on extra material. As the Gougeon Brothers recommend in their book, wait until the epoxy is “tacky” !
It was then time to start laminating the different layers of fiber glass cloths. We started with some 300 gr matt fiber glass…just to level up the repair. The edges were trimmed with resin mixed with silica.

This procedure takes time, so when many layers have to be applied it is a good idea to let it cure completelly and the next day sand it and continue adding up more layers. This is what we had to do in this repair because of the quantity of fabric and the great amount of resin used.

The final step was to create the needed curve that the deck has on this area. The ideal material for this is the low-density filler, for filleting and fairing work.
This lightweight additive has good load bearing strength but is also easy to sand by hand when cured.

For the next repair we had to create a wooden template to fill and reinforce this specific area that is so important on the foredeck, since it’s where the cleat is supposed to be.
After filling the area around the edges with the same mixture: epoxy resin mixed with colloidal silica and milled glass, we sank into it a plywood piece cut in shape. It was then necessary to place something heavy on top of it, in order to make it stay put.

Then we had to follow the same procedure as we did with the hatch repair.

And here again, we finished the job by filling the area with lightweight filler.

There we are, it looks already better…less holes on deck !

We had to stop our work for Easter Day . This is the most important celebration in Greece. It is the day of the grilled lamb (or goat in our case….) Here we are with the roasting animal ! It is actually something like a big souvlaki ! For vegeterians and vegans it’s a macabre spectacle…

and of course the Easter feast is like any other…

…plus some sweets for dessert…

…and then, after the long-awaited rest, we returned to “Samourai” with more appetite for work and less for food !
“Attacking” the old hatches was our next task, the good thing was that removing them was much faster and easier than the windows. In the old times, when the Contessa 32 was build, there were no marine sealants like Sikaflex, so the yard used to apply a kind of non curing sealant probaly called “buthyl”. It is still in use today and some boatbuilders prefer that instead of marine polyurethane sealant which has the disadvantage to become permanent.

Anyway, we cleaned all the area around the hatches frames and filled up the old holes with epoxy filler.

This is one of the backing plate that was sent by Jeremy Rogers yard along with the new u-bolts. We bonded it in place with epoxy resin and silica. And then installed the U-bolt with marine sealant.


The deck totally stripped up and about to become waterproof !

Finally the new Gebo hatches ! This was an easy job and psychologicaly very rewarding !

Before installing permanently the hatches, we had a bit of a discussion about which way to fit the openings. There are two ways to fit them. One way is facing the front of the boat and the other way is fitting them facing the stern. This is probably a personnal choice but we thought it would be better to keep it as it was originally. We chose to fit them facing the stern thinking this is more seaworthy. But, in hot climates, some sailors prefer having the opening facing the bow to create some more ventilation.

These are the U-bolt holes. The new upper shrouds U-bolts were actually fitting in the same old holes. But the lower shrouds U-bolts have a wider spacing than the old ones. To avoid drilling 2 new holes for each U-bolt, we only filled up 1 of the 2 old with epoxy resin + silica. The next day, we drilled through the filler matching perfectly the U-bold width. In practice, the new lower shrouds U-bolts were moved a few mm but makes no difference for the stays. This job was well documented on the CO32 forum and it helped us a lot to avoid any mistakes.

The new U-bolts were fitted in with Sikaflex 292….we did regret using this marine sealant because the part which was in the sunlight did become like toothpaste after a week ! We found out later on some internet forums that other users had similar problems with this brand especially with teak decks. The Sikaflex 292, which is recommended for fitting deck gear, is definitely not resisiting to sunlight. The cartridge was not expired and we did follow the right procedure ! In the end, we had to re-apply some Sikaflex 295 UV around the seal to be sure it is not going to melt again in the sun. Nevertheless, the Sikaflex which was under deck and not in the sunlight did cure perfectly well, so the problem was not alarming.
The procedure for fitting the new windows was a long job but we had a great documentation sent by the Jeremy Rogers yard describing all the steps. After cleaning the old sealant around the window frames, we had to fill up the voids with epoxy + filler and also bonded the inner moulding with the deck. We used plenty of clamps and then trimmed the excess filler.

The next day, we sanded the filler and start preparing the frames for the final bonding.

The smallest windows were quite easy to install, despite the fact that they were a bit tricky to fit straight.

The longer windows, the ones above the galley and the chart table were more complicate to fit. We found out after bonding the inner moulding with the deck, that these two windows were not matching exactly the deck curve. When fitting the windows temporally there was a void created on the sides. We decided to use a rubber gasket of 3mm to make sure the window will not brake when screwed on.

